Fingerprint Scanning and Comparison
Using the Document Reader SDK with the compatible devices, you have the ability to scan and compare the finger images from different sources: from the document's RFID chip and the fingerprint scanner.
This article describes how to set up and perform the fingerprint scanning procedure.
- Requirements
- Before You Start
- Processing in Test App
- Processing via COM Interface
- Results Exploration
Requirements
ID Document
- ID document with RFID chip, containing fingerprint data
Hardware
- Compatible fingerprint scanner from one of the manufacturers:
- Regula or third-party compatible Document Reader device with integrated RFID scanner module.
Software
- Installed drivers for your specific model of the fingerprint scanner
- Installed and properly licensed Document Reader SDK for Windows
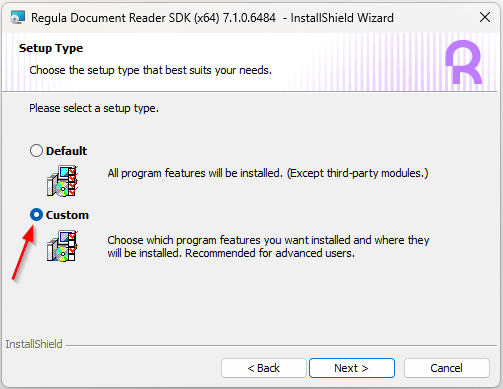
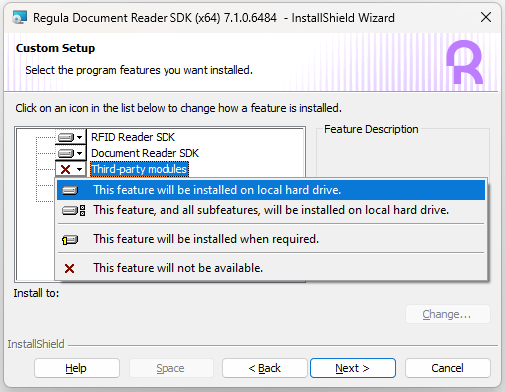
Use the custom Document Reader SDK installation procedure with the third-party modules option selected. This step ensures the installation of all needed additional libraries. See the screenshots below.
Before You Start
1. Connect both the Document Reader and the Fingerprint Scanner devices to the PC.
2. Launch the Document Reader (READERDEMO.EXE) desktop application.
3. Open the Options dialog window (from the main toolbar panel, or from the File menu, or press Alt + F8).
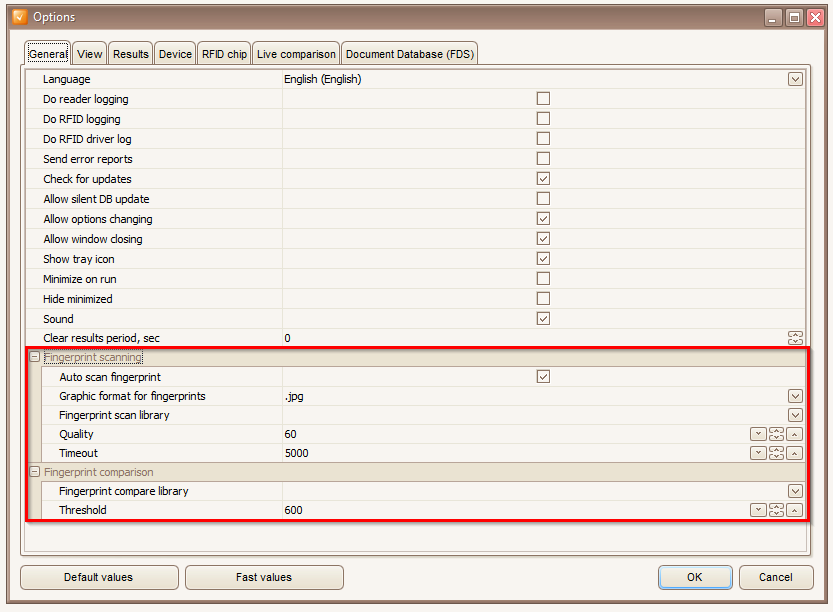
4. Use the subsections Fingerprints scanning and Fingerprints comparison to define the parameters related to fingerprint processing.
See the table with configuration parameters and their descriptions below.
Fingerprint scanning
| Parameter | Values | Default | Description |
|---|---|---|---|
| Auto scan fingerprint | on/off |
on |
Whether to automatically open the UI form after the document scanning and processing is finished. |
| Graphic format for fingerprints | .jpg.bmp.wsq |
.jpg |
Graphic format of the image, in which the fingerprint is processed and saved. |
| Fingerprint scan library | BiolinkFPR.dllTouchlabFPR.dllMiaxisFPR.dllFutronicFPR.dll |
— | Software library used for fingerprint scanning. The concrete selection depends on the fingerprint scanner vendor. |
| Quality | 0-100, % |
60 |
Minimum acceptable quality of the fingerprint image in percent. The device continues repetitive scanning until the quality of the resulting fingerprint image reaches or exceeds the defined value. |
| Timeout | any integer, ms | 5000 |
The timeout for fingerprint scanning in ms. If the resulting fingerprint image quality doesn't reach the defined quality percent during the specified time interval, the scanning process stops. |
Fingerprint comparison
| Parameter | Values | Default | Description |
|---|---|---|---|
| Fingerprint compare library | RegulaFPR.dllBiolinkFPR.dll |
— | Software library used for fingerprint comparison. If not selected, the fingerprints are only scanned, but not compared with the data, extracted from RFID chip. |
| Threshold | 0-2000 |
600 |
Minimum acceptable threshold for the fingerprint comparison result. For most cases, the concrete value is selected empirically. For example, the default 600 value corresponds to approximately 97% of compared fingerprint coincidence. |
5. For the document scanning device to obtain the fingerprint data from the document, go to the RFID Chip tab of the same Options dialog window and select the parameters as displayed below.
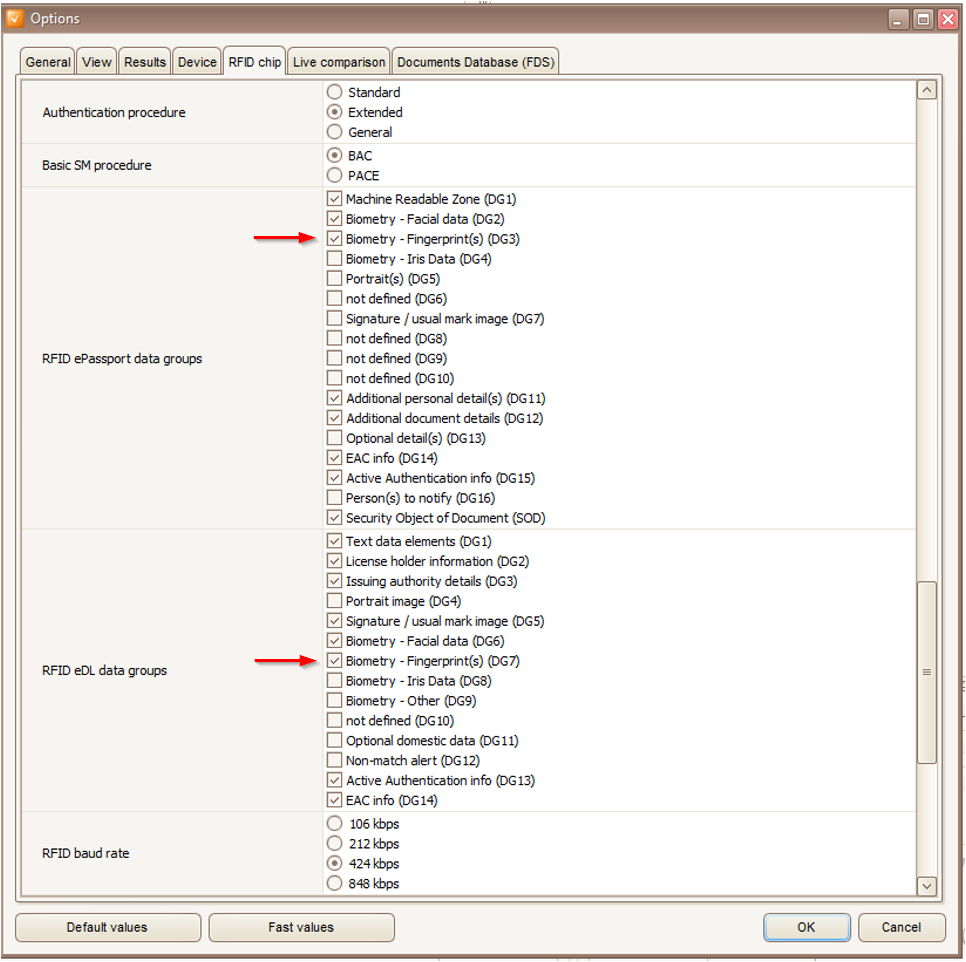
As shown in the picture, select the following data groups:
- Biometry - Fingerprint(s) (DG3) in RFID ePassport data groups section
- Biometry - Fingerprint(s) (DG7) in RFID eDL data groups section
During document scanning, the Document Reader SDK extracts the selected data groups from the RFID chip.
6. Define where and in what format the results of document scanning and fingerprint comparison will be saved. Go to the Results tab of the Options dialog window and select the appropriate parameters.
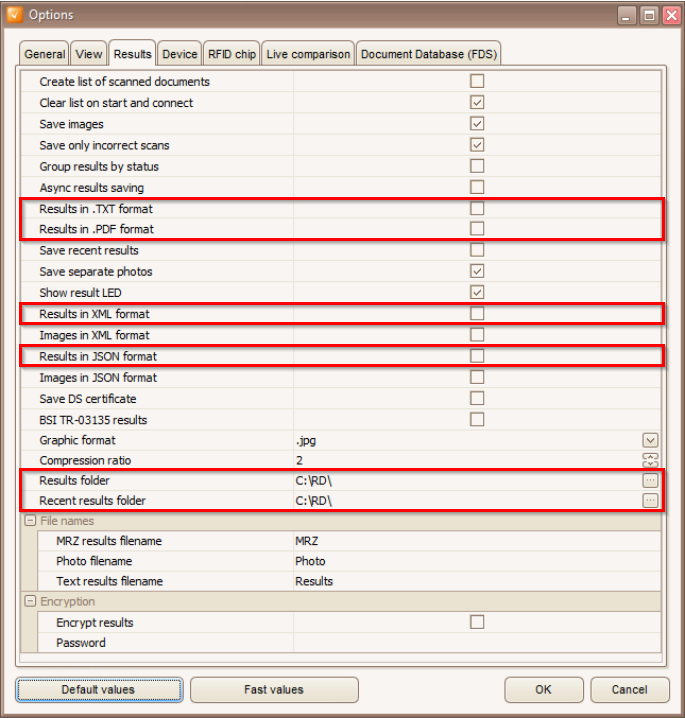
The results can be saved in the formats:
TXTPDFXMLJSON
You can also select the custom folder, where these files will be saved.
For security reasons, fingerprint images are not saved to the PC. Only the comparison results in statistical form are stored.
Processing in Test App
After performing all the preliminary steps, you can process the fingerprints. Follow the instructions further.
1. Using the document reader device, scan the ID document with RFID chip, containing the fingerprint data.
If the data is successfully extracted from the RFID chip and the Auto scan fingerprint parameter is selected in Fingerprint scanning options, the specific UI form is displayed.
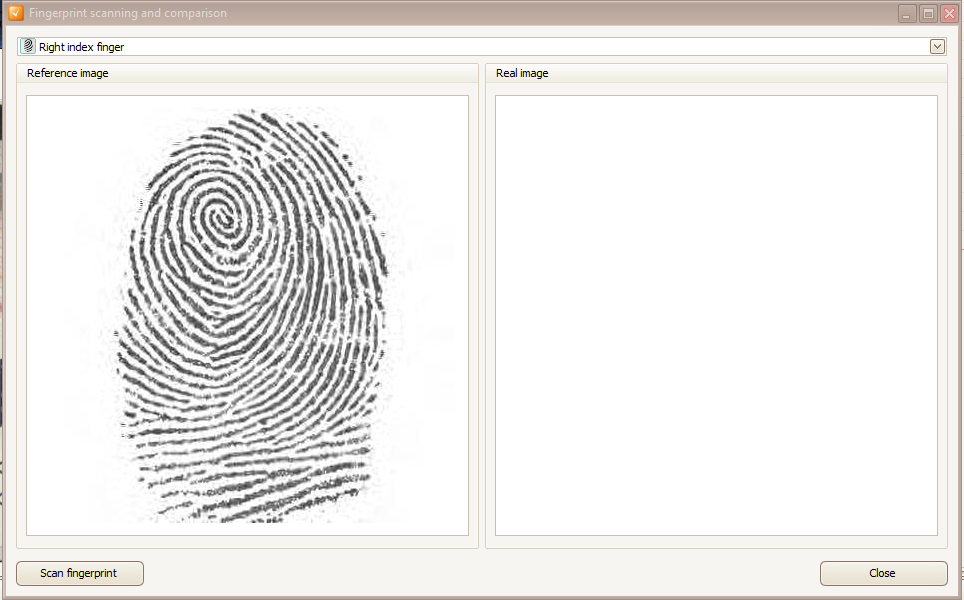
The Fingerprint scanning and comparison UI form shows the Reference image from the document's RFID chip in the left-side panel. The dropdown list at the top lets you select a reference finger image.
Note that the fingers, for which the images have been detected in the RFID chip, are marked with the special fingerprint symbol, see the screenshot:
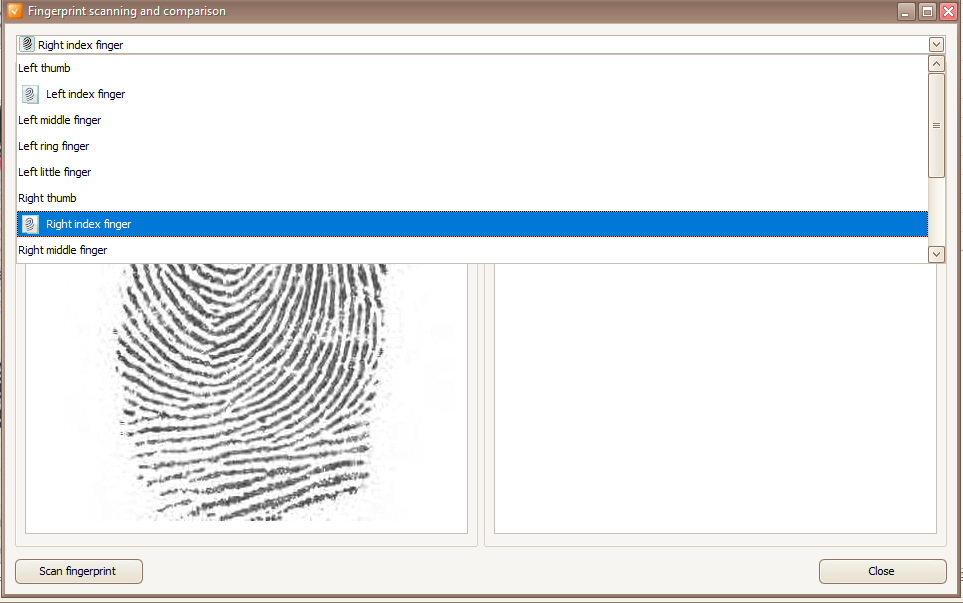
You can start fingerprint scanning and comparison.
2. Using the fingerprint scanner device, scan the fingers.
The scanning process is either started automatically at the fingers detection, or by clicking the corresponding Scan fingerprint button in the Fingerprint scanning and comparison UI form.
After the fingers have been scanned successfully, the same UI form is refreshed, reflecting the comparison results for the Reference image and the Real image, recently obtained from the fingerprint scanner device.
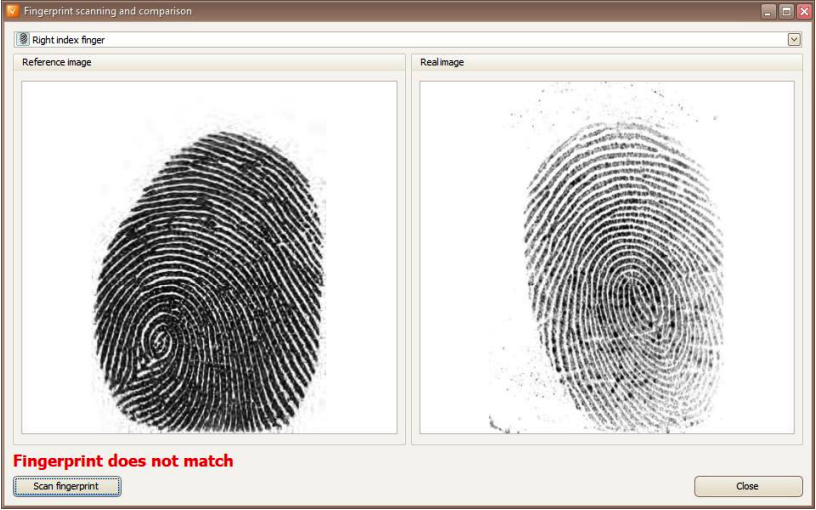
Using the dropdown at the top, you can change the reference finger image. If the selected finger has already been scanned, the corresponding comparison result will be displayed without the need of rescanning.
You can also process fingerprints through the COM interface methods. See the following section for details.
Processing via COM Interface
Besides providing the GUI for controlling the functionality, the Test Application also acts as the COM automation server.
The RegulaReader.READERDEMO COM object provides methods for SDK functionality, including fingerprint processing.
All the fingerprint-related COM methods' names start with the FP prefix. See the details and descriptions further.
FPScan
The FPScan method starts the manual scanning of the fingers. This method lets you define only which fingers to scan. Other parameters come from the Test Application settings.
Parameters
The method takes as a parameter the integer index of the finger to be scanned AFingerIndex.
The value must be selected from the range of constants as follows:
| Constant name | Value | Description |
|---|---|---|
gf_Finger_LeftThumb |
300 |
left thumb |
gf_Finger_LeftIndex |
301 |
left index finger |
gf_Finger_LeftMiddle |
302 |
left middle finger |
gf_Finger_LeftRing |
303 |
left ring finger |
gf_Finger_LeftLittle |
304 |
left little finger |
gf_Finger_RightThumb |
305 |
right thumb |
gf_Finger_RightIndex |
306 |
right index finger |
gf_Finger_RightMiddle |
307 |
right middle finger |
gf_Finger_RightRing |
308 |
right ring finger |
gf_Finger_RightLittle |
309 |
right little finger |
gf_Finger_Right4Fingers |
313 |
4-finger image of right hand |
gf_Finger_Left4Fingers |
314 |
4-finger image of left hand |
gf_Finger_2Thumbs |
315 |
2-thumb fingerprint |
Return value
The method returns boolean value, indicating whether the scanning succeeded or not.
FPScanUI
The FPScanUI method displays the Fingerprint scanning and comparison UI form for you to perform all further actions there.
The method doesn't take parameters or return any value.
FPScanWithParams
The FPScanWithParams method performs the fingerprint scanning in accordance with the given parameters.
Parameters
The method takes the JSON string with parameters in a custom format, depending on the concrete fingerprint scanner manufacturer.
Below, you can see the example JSON for the Jenetric device.
Example JSON for Jenetric fingerprint scanner (click to expand)
{
   "finderIndex" : 301,
   "mode" : 3,
   "missinfFingers": 4,
   "contentAnalysesToDisable" : 14
}
Return value
The method returns boolean value, indicating whether the scanning succeeded or not.
FPCompare
The FPCompare starts the manual comparing of all the fingerprints currently available in the context of the COM object.
That means, to perform the successful fingerprint comparison you need to:
- Scan the document with RFID chip, containing fingerprint data (to get the reference image)
- Scan the fingerprint (to get the real image)
If multiple fingerprints are available, the SDK subsequently compares each reference image with real image to find any match.
Return value
The method returns integer value from the eCheckResult enumeration, indicating the status of the completed comparison. See the details below.
| Constant name | Value | Description |
|---|---|---|
ch_Check_Error |
0 | Fingerprint comparison has been completed with an error. |
ch_Check_OK |
1 | Fingerprint comparison has been completed successfully. |
ch_Check_WasNotDone |
2 | Fingerprint comparison has not been completed. |
Results Exploration
After the fingerprint check has been successfully performed, the Fingerprint indicator in the Results panel shows the comparison result:

The detailed comparison result can be obtained either in XML, TXT, PDF, or JSON format (if the corresponding setting is specified in the Options dialog, Results tab).
The comparison results are also available from the RegulaReader.READERDEMO COM object, by calling the CheckReaderResult method with eRPRM_ResultType.RPRM_ResultType_FingerPrints result type as a parameter. In this case, the RPRM_ResultType_FingerPrint_Comparison fingerprint comparison results contain the concrete similarity values in percent.