Infrastructure Security
The Document Reader SDK Web Service does not inherently support authentication and processes all incoming requests without distinction. To mitigate the risk of unauthorized or malicious usage, it is strongly recommended not to expose the Web Service to public Internet access.
For enhanced security, you need to deploy the Document Reader SDK Web Service within a closed perimeter, like a Demilitarized Zone (DMZ), and configure a proxy server at the entrance point:

Security Suggestions
See the list of suggestions on how to provide security of the Document Reader SDK Web Service:
- Disable the demo application that is shipped with the Document Reader SDK Web Service. By deactivating an extra worker designed for demonstration only, you decrease potential vulnerability risk.
- Restrict access to the service to the minimum possible level. Provide access to the backend only via private wired networks.
- Use HTTPS connection where possible.
- Limit incoming connections to apps by firewalls or security groups or rules to grant access only to verified and authorized clients, VMs, or services.
- Use a load balancer in front of the Web Service itself. In that case, a security configuration would be clearer and more advanced. Instead of terminating an SSL connection and manually configuring the secure headers in the docreader container, let the service perform its primary function—process a request. The rest responsibilities (including security) should be handled by a load balancer.
- Implement a user authorization procedure, for example, via nginx and the corresponding plugin.
- Avoid using external image URLs in requests.
HTTPS
Option 1. nginx as reverse proxy (recommended)
Run nginx as a frontend container for HTTPS processing and proxying service requests to the backend docreader container.
Here you can find the docker-compose.yml file and the nginx default.conf file for reference.
Run nginx as a frontend service for HTTPS processing and proxying service requests to the backend docreader service.
Here you can find the nginx default.conf file for reference. The SSL certificates should be placed to the /etc/ssl/ folder.
Enable Basic authentication
To enable the Basic authentication for the Document Reader SDK Web Service, you'll need to place in a single directory the following files:
docker-compose.yml— Docker configuration filenginx.conf— nginx reverse proxy server configuration file.htpasswd— file containing created users and passwords (needs to be manually generated at the first launch, the procedure is considered hereinafter)regula.license— valid license file
1. Create the docker-compose.yml file with the following content:
version: "3.9"

services:
  docreader:
    image: regulaforensics/docreader:latest
    volumes:
      - ./regula.license:/app/extBin/unix/cpu/regula.license
  nginx:
    image: nginx:alpine
    ports:
      - "8000:80"
    volumes:
      - ./nginx.conf:/etc/nginx/nginx.conf
      - ./.htpasswd:/etc/nginx/.htpasswd
    depends_on:
      - docreader
2. Create the nginx.conf file with the following content:
events {
}
http {
  server {
    listen 80;

    location / {
       proxy_pass http://docreader:8080;
       auth_basic "Docreader with auth";
       auth_basic_user_file /etc/nginx/.htpasswd;
    }
  }
}
3. Create the .htpasswd file by executing the command below (replace the placeholders <user> and <password> with corresponding values):
printf "<user>:$(openssl passwd -apr1 <password>)\n" >> .htpasswd
The command can be executed multiple times to create the required number of users.
4. Ensure that your directory contains a valid and active regula.license file.
5. To start the Document Reader SDK Web Service, execute the command:
docker compose up -d
Access the service through the configured reverse proxy URL (http://docreader:8080 in the example above), and you'll be prompted to enter the username and password contained in the .htpasswd file.
Your Document Reader SDK Web Service instance is now set up. It uses the nginx reverse proxy server for Basic authentication.
Enable mTLS
Mutual Transport Layer Security (mTLS) is an extension of the standard TLS protocol in which not only the server, but also the client device, proves its identity during connection establishment.
This helps protect the Document Reader Web Service from connections initiated by unauthorized devices. When mTLS is enabled, the client device must provide a certificate, which is then verified by the server before the connection is accepted.
As a result, only devices with trusted client certificates can establish a connection to the server. To establish an mTLS connection, the feature must be configured on both the server and the client.
The following description covers only the server side configuration. For the client configuration details, see the Mobile Mutual TLS guide.

To enable the mTLS for the Document Reader Web Service, configure nginx as a reverse proxy that terminates TLS, validates client certificates, and forwards requests to the Document Reader API container.
You will need the following files:
docker-compose.ymlnginx.conf— an nginx configuration file./certs— a directory with mTLS certificate filesregula.license— a valid license file
1. Create a docker-compose.yml file:
version: "3.9"

services:
  docreader:
    image: regulaforensics/docreader:latest
    volumes:
      - ./regula.license:/app/extBin/unix/regula.license

  nginx:
    image: nginx:alpine
    ports:
      - "8443:443"
    volumes:
      - ./nginx.conf:/etc/nginx/nginx.conf
      - ./certs:/etc/nginx/certs
    depends_on:
      - docreader
2. Configure the nginx.conf file to enable mTLS:
events {}

http {
  server {
    listen 443 ssl;

    ssl_certificate /etc/nginx/certs/server.crt;
    ssl_certificate_key /etc/nginx/certs/server.key;

    ssl_client_certificate /etc/nginx/certs/ca.crt;
    ssl_verify_client on;

    location / {
       proxy_pass http://docreader:8080;
    }
  }
}
3. Run the following command to start the configuration:
docker compose up -d
4. To verify the setup, send a request:
Without a client certificate
curl -k https://localhost:8443/api/healthz
Expected response:
<html>
<head><title>400 No required SSL certificate was sent</title></head>
<body>
<center><h1>400 Bad Request</h1></center>
<center>No required SSL certificate was sent</center>
<hr><center>nginx/1.29.7</center>
</body>
</html>
With a client certificate
curl -k https://localhost:8443/api/healthz \
  --cert certs/client.crt \
  --key certs/client.key
Expected response:
{"app":"Regula Document Reader Recognition Web API", ... "ctx":{"userIp":"172.23.0.3"}}
Option 2. Using HTTPS
To run the Document Reader SDK Web Service via HTTPS perform the following steps:
1. Add 644 permissions to certificates so the server is able to read certificates.
chmod 644 ~/cert.crt ~/cert.key
2. Pass cert.crt and cert.key files to the container.
3. Set the SSL parameters.
4. Forward the container port to 8443 host port:
docker run -it -p 8443:8080 -v ~/regula.license:/app/extBin/unix/regula.license -v ~/cert.crt:/app/certs/tls.crt -v ~/cert.key:/app/certs/tls.key regulaforensics/docreader
1. Create the /opt/regula/document-reader-webapi/certs folder and copy certificates to it.
2. Set the SSL parameters.
3. Restart the service.
JWT Authorization
Adding a JSON Web Token (JWT) to an HTTP request is a client authorization method that uses a trusted third party—an identity provider (IDP).
The token structure and operations with it are regulated by the open industry standard RFC 7519.
In brief, the process of JWT authorization can be described by the steps:
1. The web client sends an authentication request to the IDP.
2. The IDP authenticates the client and, in a case of success, generates the JWT.
JWT contains the encoded information about the client and the digital signature of the entire token. The signature is effectively the hash, generated with either the secret key (for symmetric hashing algorithm) or the IDP's private key (for asymmetric hashing algorithm).
3. The IDP issues the secure token back to the client, which stores it for subsequent requests.
4. The client sends the request (containing the JWT among headers) to the server.
5. The server gets the request, validates token expiration and checks its digital signature using the secret key (for symmetric hashing algorithm) or the IDP's public key (for asymmetric hashing algorithm).
6. If verification succeeds, the server processes the request and returns the response to the client.
Warning
JWT encodes and hashes information, but doesn't hide, encrypt, or protect data by default. So, this mechanism alone shouldn't be used to protect sensitive data.
Because of the great diversity in available JWT variants and ways to generate it, there is no default implementation included in the Document Reader SDK. Instead, just the exemplary solution and reference materials are provided.
Keycloak as on-prem IDP
This section considers the on-premises solution for performing JWT authorization using Keycloak as an identity provider and Traefik as a reverse proxy server. The description is based on the sample implementation, available on GitHub: JWT authorization.
For simplicity, the example system considers the password authentication to obtain the access token. But there are many more complex authentication methods that can further improve your system protection. For more details, see the official OAuth Grant Types documentation.

Let's have a look at it step by step.
1. The web client sends an authentication request /token to the IDP (Keycloak in the current example).

2. Keycloak validates the request, authenticates the client, computes the secure token, and sends it back to the client.

See the code snippet, demonstrating how to generate the exemplary token for the client with the username RegulaUser and password myP@ssW0rd by Keycloak:
curl --location 'http://localhost:8080/realms/regula/protocol/openid-connect/token' \
--header 'Content-Type: application/x-www-form-urlencoded' \
--data-urlencode 'grant_type=password' \
--data-urlencode 'username=RegulaUser' \
--data-urlencode 'password=myP@ssW0rd' \
--data-urlencode 'client_id=account' \
--data-urlencode 'scope=openid'
3. The web client sends the /api/process request to the reverse proxy server (Traefik in the considered example) with attached JWT as one of the HTTP headers: "Authorization": "Bearer <access_token>". JWT is also saved on the client side for further requests to the server.

4. The reverse proxy server forwards any request to API to specific authorization service (middleware).

See the excerpt code snippet from the HTTP reverse proxy server configuration file:
routers:
    middlewares:
    auth:
      forwardAuth:
        address: "http://auth:3000/verify-token"
        trustForwardHeader: true

    route-api:
      rule: "PathPrefix(`/api/process`)"
      service: regula-api
      priority: 1000
      entryPoints:
        - web
      middlewares:
        - auth

    route-default:
      rule: "PathPrefix(`/`)"
      service: regula-api
      priority: 1
      entryPoints:
        - web
Here you can see that the custom auth web service is responsible for the request validation, by invoking the /verify-token endpoint.
The complete config file http.yml is available for reference on GitHub: Traefik reverse proxy server configuration.
5. The middleware authorization service checks that the token exists and then, depending on the concrete implementation, validates it according to a number of parameters: the client ID, expiration date, etc.
- If validation succeeds, the reverse proxy server redirects the request to the Document Reader Web Service for actual processing.
- If validation fails, the reverse proxy server returns the HTTP status
401 Unauthorized.

For more hands-on experience, you can launch locally the exemplary Node.js client from Regula's GitHub by running the following commands:
git clone https://github.com/regulaforensics/DocumentReader-web-js-client.git
cd DocumentReader-web-js-client/examples/auth/
npm install
docker-compose up -d
node client/index.js
6. After the document processing is completed on the Regula Document Reader Web Service, processing results are sent back to the web client.

To have a better understanding of how the process goes, see the sequence diagram of the interactions within the example system.
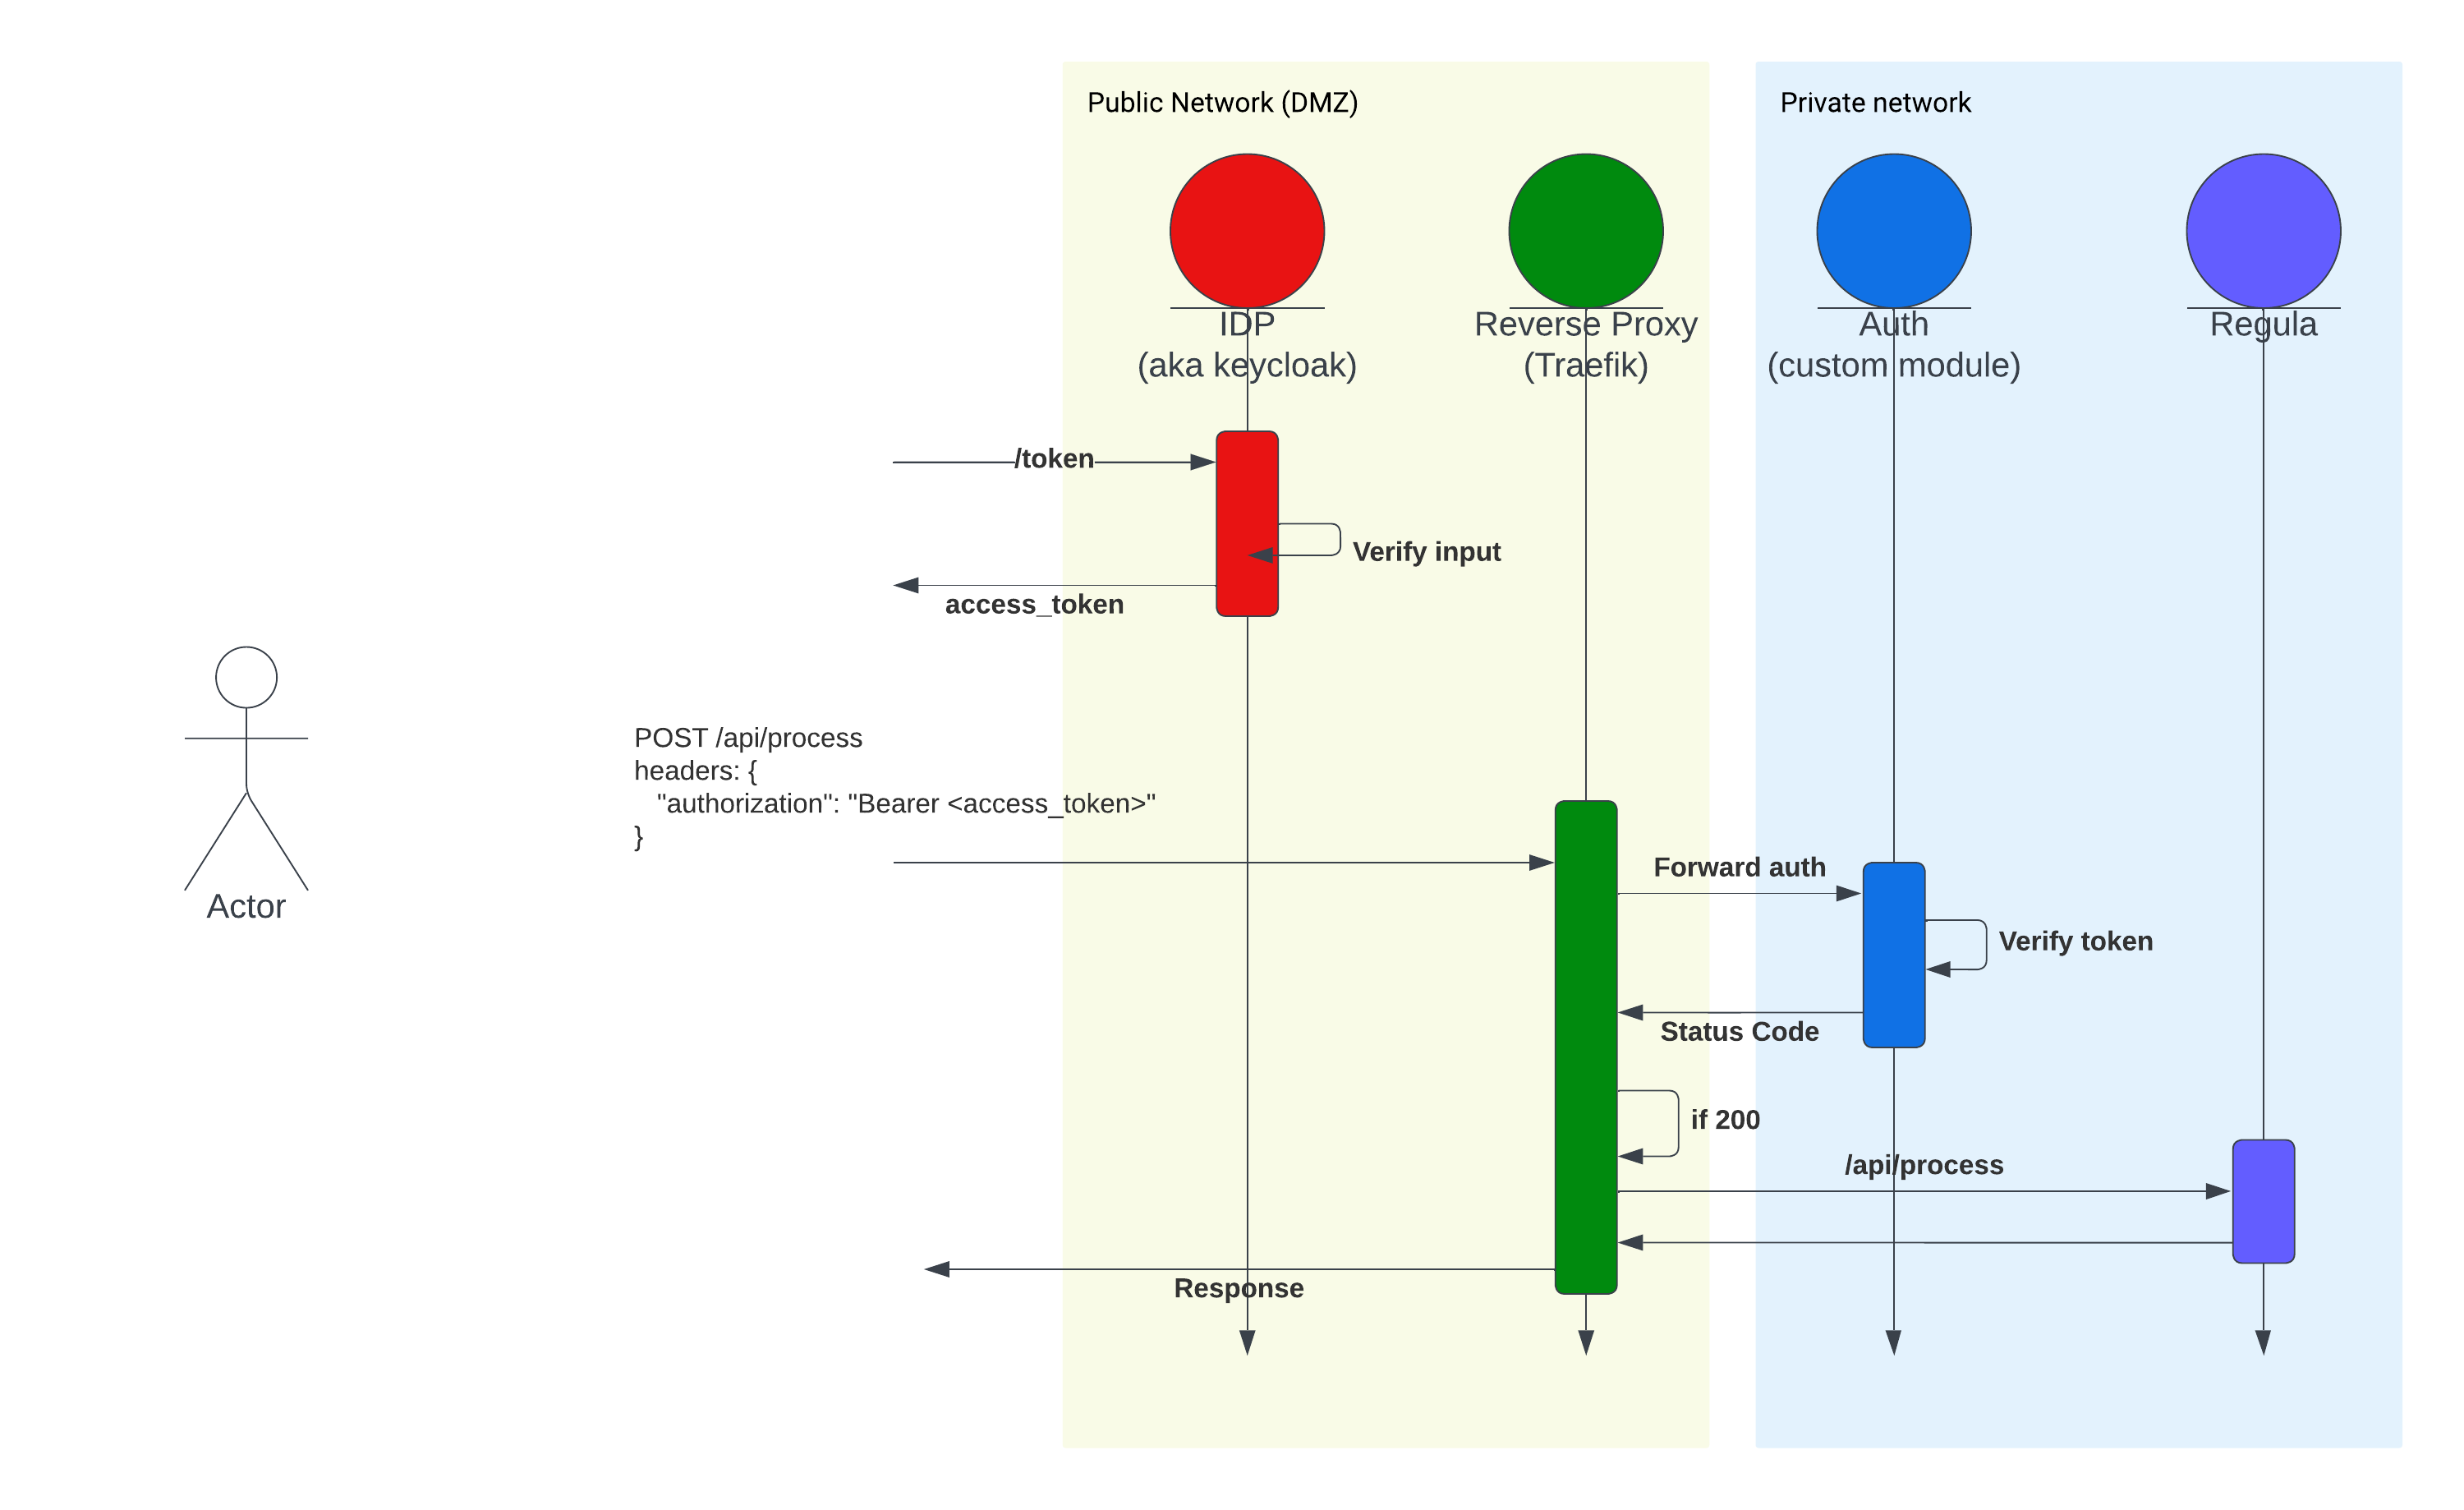
Cloud IDPs
If you're interested in using the cloud IDP solutions for your project infrastructure, take a look into the following links to the corresponding documentation:
- Amazon Cognito
- Google Cloud Identity Platform
- Microsoft Entra ID (former Azure Active Directory)
It's just a reference list, demonstrating only several of the many options available on the market.