RFID Chip Processing
Overview
Biometric documents are documents similar to the traditional ones except for one significant difference: they have an RFID chip embedded. The information stored on the chip is the same as that displayed on the data page of identity documents: full name, date of birth, place of birth, date of issue, expiration date, etc.
The chip also contains a biometric identifier in the form of a digital image of the identity document photo. The chip has a unique identification number and a digital signature as a protective measure.
The Document Reader SDK allows reading data from RFID chip memory (international standard ISO/IEC 14443) when working with devices equipped with NFC hardware, performing procedures of passive and active authentication.
Current page describes the process of RFID chip processing via the integrated NFC module of the mobile device itself. There is also the capability to use external RFID readers over Bluetooth, for details see the dedicated RFID Chip Processing via External Devices page.
1. Add Permissions
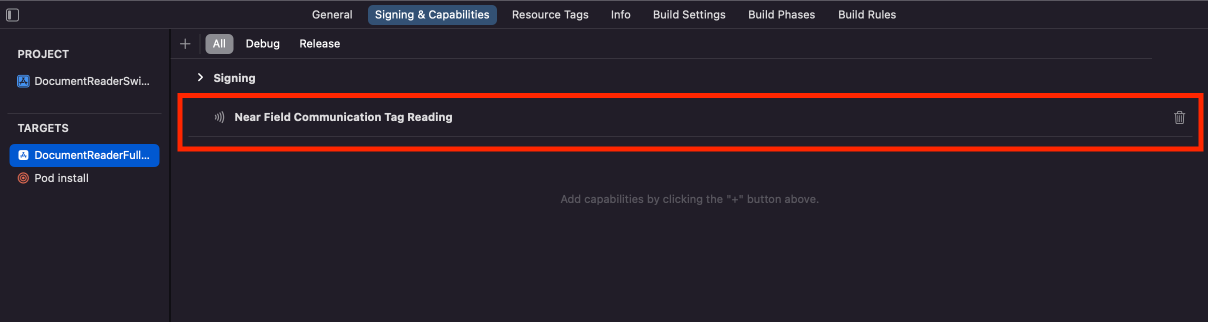
iOS
1. Add Near Field Communication Tag Reading under the Capabilities tab for the project’s target:
2. Add the NFCReaderUsageDescription permission to your Info.plist file, this is needed to access the NFC hardware:
<key>NFCReaderUsageDescription</key>
<string>NFC tag to read NDEF messages</string>
3. To access a particular function of the electronic document or to a file in its memory, it is required to select the corresponding applications first. It's a requirement of Apple to specify them explicitly in Info.plist.
Declare com.apple.developer.nfc.readersession.iso7816.select-identifiers—a list of application identifiers that the app must be able to read according to ISO7816:
<key>com.apple.developer.nfc.readersession.iso7816.select-identifiers</key>
<array>
    <string>A0000002471001</string>
    <string>E80704007F00070302</string>
    <string>A000000167455349474E</string>
    <string>A0000002480100</string>
    <string>A0000002480200</string>
    <string>A0000002480300</string>
    <string>A00000045645444C2D3031</string>
</array>
Identifiers of all supported by the Document Reader SDK standard applications are given below.
| Identifier | Description |
|---|---|
| A0000002471001 | ePassport application |
| E80704007F00070302 | eID application |
| A000000167455349474E | eSign application |
| A0000002480100 | eDL application |
| A0000002480200 | eDL application |
| A0000002480300 | eDL application |
| A00000045645444C2D3031 | eDL application (Europe) |
Android
Access to NFC hardware is mandatory for the RFID chip processing. To grant this permission, add the NFC key to your AndroidManifest file:
<uses-permission android:name="android.permission.NFC" />
When working with the device Mobile Document Authenticator Regula 1120 or Mobile Workstation Regula 7310, and you need to start RFID chip processing with a vibration, add the optional VIBRATE permission:
<uses-permission android:name="android.permission.VIBRATE" />
2. Set Processing Scenario
If you have set up the optical processing with the selected scenario, and the license used for Mobile SDK covers the RFID chip reading, then no need to define the scenario again for the RFID chip processing—it will be set automatically. The access key for RFID chip reading is obtained during the optical processing.
If you don't need the document optical processing, but only RFID chip reading, then start a new document reading session, and manually set the access key and the dedicated RFID scenario as follows:
DocReader.shared.startNewSession()
DocReader.shared.processParams.scenario = RGL_SCENARIO_RFID;
RGLDocReader.shared.startNewSession();
RGLDocReader.shared.processParams.scenario = RGL_SCENARIO_RFID;
DocumentReader.Instance().startNewSession()
DocumentReader.Instance().processParams().scenario = Scenario.SCENARIO_RFID
DocumentReader.Instance().startNewSession();
DocumentReader.Instance().processParams().scenario = Scenario.SCENARIO_RFID;
DocumentReader.instance.startNewSession();
DocumentReader.instance.processParams.scenario = Scenario.RFID;
DocumentReader.instance.startNewSession();
DocumentReader.instance.processParams.scenario = Scenario.RFID
DocumentReader.startNewSession(_ => { }, _ => { })
DocumentReader.setProcessParams({
    scenario: ScenarioIdentifier.SCENARIO_RFID
}, (str) => { console.log(str) }, (error) => { console.log(error) });
DocumentReader.startNewSession()
DocumentReader.setProcessParams({
    scenario: ScenarioIdentifier.SCENARIO_RFID
});
DocumentReader.startNewSession(function (m) { }, function (e) { })
DocumentReader.setProcessParams({
    scenario: ScenarioIdentifier.SCENARIO_RFID
}, function (m) { }, function (e) { console.log(e); });
// Android
DocumentReader.Instance().StartNewSession();
DocumentReader.Instance().ProcessParams().Scenario = Scenario.ScenarioRFID;

// iOS
RGLDocReader.Shared.StartNewSession();
RGLDocReader.Shared.ProcessParams.Scenario = Constants.RGL_SCENARIO_RFID;
3. Open RFID Reader
To open the RFID chip reading activity and start its processing, use the method below.
DocReader.shared.startRFIDReader(fromPresenter: self, completion: { (action, results, error) in
    switch action {
    case .complete:
        print("Completed")
    case .cancel:
        print("Cancelled by user")
    case .error:
        print("Error: \(error)")
    default:
        break;
    }
})
[RGLDocReader.shared startRFIDReaderFromPresenter:self completion:^(RGLDocReaderAction action, RGLDocumentReaderResults * _Nullable results, NSError * _Nullable error) {
    switch (action) {
        case RGLDocReaderActionComplete: {
            NSLog(@"Completed");
        }
        break;

        case RGLDocReaderActionCancel: {
            NSLog(@"Cancelled by user");
        }
        break;

        case RGLDocReaderActionError: {
            NSLog(@"Error: %@", error);
        }
        break;

        default:
        break;
    }
}];
DocumentReader.Instance().startRFIDReader(this@MainActivity, object : IRfidReaderCompletion() {
    override fun onCompleted(
        rfidAction: Int,
        documentReaderResults: DocumentReaderResults?,
        e: DocumentReaderException?
    ) {
        ...
    }
})
DocumentReader.Instance().startRFIDReader(MainActivity.this, new IRfidReaderCompletion() {
    @Override
    public void onCompleted(int action, @Nullable DocumentReaderResults results, @Nullable DocumentReaderException error) {
        ...
    }
});
DocumentReader.instance.rfid(RFIDConfig((action, results, error) {
  // handle results
}));
DocumentReader.instance.rfid(new RFIDConfig((action, results, error) => {
  // handle results
}))
DocumentReader.startRFIDReader(null, _ => { }, _ => { })
DocumentReader.startRFIDReader(null, _ => { }, _ => { }).subscribe(m => { })
DocumentReader.startRFIDReader(null, function(m) { }, function(e) { })
// Android
public void StartRFID()
{
    DocumentReader.Instance().StartRFIDReader(this, this);
}

public void OnCompleted(int action, DocumentReaderResults results, string error)
{
    // handle completion
}

// iOS
void startRfid()
{
    RGLDocReader.Shared.StartRFIDReaderFromPresenter(this, HandleDocumentReaderRfidCompletion);
}

void HandleDocumentReaderRfidCompletion(RGLDocReaderAction action, RGLDocumentReaderResults result, string error)
{
    // handle completion
}
4. Stop RFID Reader
To stop the RFID chip reading activity programmatically, use the method below.
DocReader.shared.stopRFIDReader(errorMessage: "Custom error message") {
    print("Stopped")
}
[RGLDocReader.shared stopRFIDReaderWithErrorMessage:@"Custom error message" completion:^{
    NSLog(@"Stopped");
}];
DocumentReader.Instance().stopRFIDReader(this@MainActivity)
DocumentReader.Instance().stopRFIDReader(MainActivity.this);
DocumentReader.instance.stopRFIDReader();
DocumentReader.instance.stopRFIDReader()
DocumentReader.stopRFIDReader(_ => { }, _ => { })
DocumentReader.stopRFIDReader()
DocumentReader.stopRFIDReader(function(e) { }, function(e) { })
// Android
DocumentReader.Instance().StopRFIDReader(this);

// iOS
RGLDocReader.Shared.StopRFIDReaderWithErrorMessage("Custom error message", () =>
{
    Console.WriteLine("Stopped");
});